

This article is part of our Computers, Components & Peripherals resource section
How to Bypass BitLocker Recovery Blue Screen
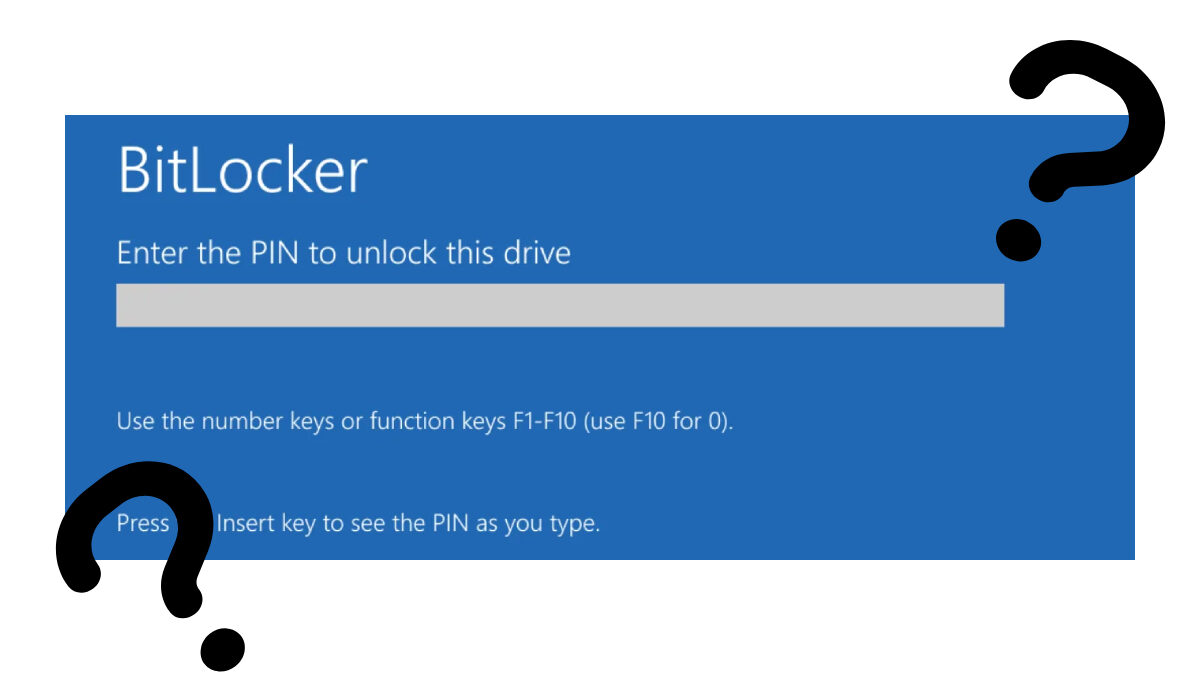
BitLocker’s recovery blue screen has a way of popping up when you least expect it. One moment, your PC is fine, then suddenly, you’re locked out. Maybe because you entered the wrong password, swapped out some hardware, or changed a boot setting.
But there isn’t a single solution that’s for everyone. It all boils down to what triggered the screen in the first place. Here, we’ll share the reasons BitLocker asks for recovery and lay out clear steps to bypass BitLocker blue recovery screen, depending on your specific situation. So, let’s get going!
Before troubleshooting, it helps to understand the physical and internal components that make up a computer. This guide explains the basics of computer hardware, including the components that may be involved when hardware changes trigger recovery.
Table of Contents
Part 1: What Causes BitLocker Recovery Blue Screen?
The BitLock recovery blue screen might materialize due to any of the following reasons:
- Multiple times, you have inserted the incorrect BitLocker password.
- Significant hardware upgrades, including motherboard or hard drive replacements.
- Certain Windows updates can trigger recovery mode.
- Malware or virus attacks detected on the system.
- Changes to the boot sequence.
- Issues with the TPM chip, like it operating badly or being off.
- Disk problems or damage.
- Changes or outdated settings in BIOS/UEFI.
- Corrupted or damaged file systems.
- Wrong BitLocker settings or configurations.
Computer monitoring software can help users observe system activity and identify unusual behavior. If you are unfamiliar with the term, this explanation of computer monitoring software provides an introduction.
For a broader look at the tools used to track computer activity, see this overview of computer monitoring software.
Changes to connected devices can also affect how a computer operates and accesses information. Learn more about monitoring devices connecting to access your data when reviewing your system’s connections.
Bonus Tip: How to Recover Data From a BitLocker-Protected Drive?
Before you learn to bypass the BitLocker recovery screen, it’s wise to retrieve your data from it lest you lose it forever. However, not any method will do, but only a professional data recovery tool like Tenorshare 4DDiG. The tool can successfully unlock your BitLocker-protected drive in one click. After unlocking the drive, it can retrieve your files completely intact, even if they were lost to you. But that’s not all. The tool offers more features:
- The tool can retrieve data from countless encrypted internal/external storage media.
- The app is capable of restoring 2000 + file types that have been erased, lost, formatted, corrupted, or hidden.
- The tool has the ability to generate disk images to back up and secure your data.
- No technical background required.
Using this tool and the instructions below, bypass BitLocker on Windows 11/10 to get back data from the locked disk:
Step 1: First, execute the BitLocker recovery tool on your PC. Then, choose the BitLocker-protected drive.
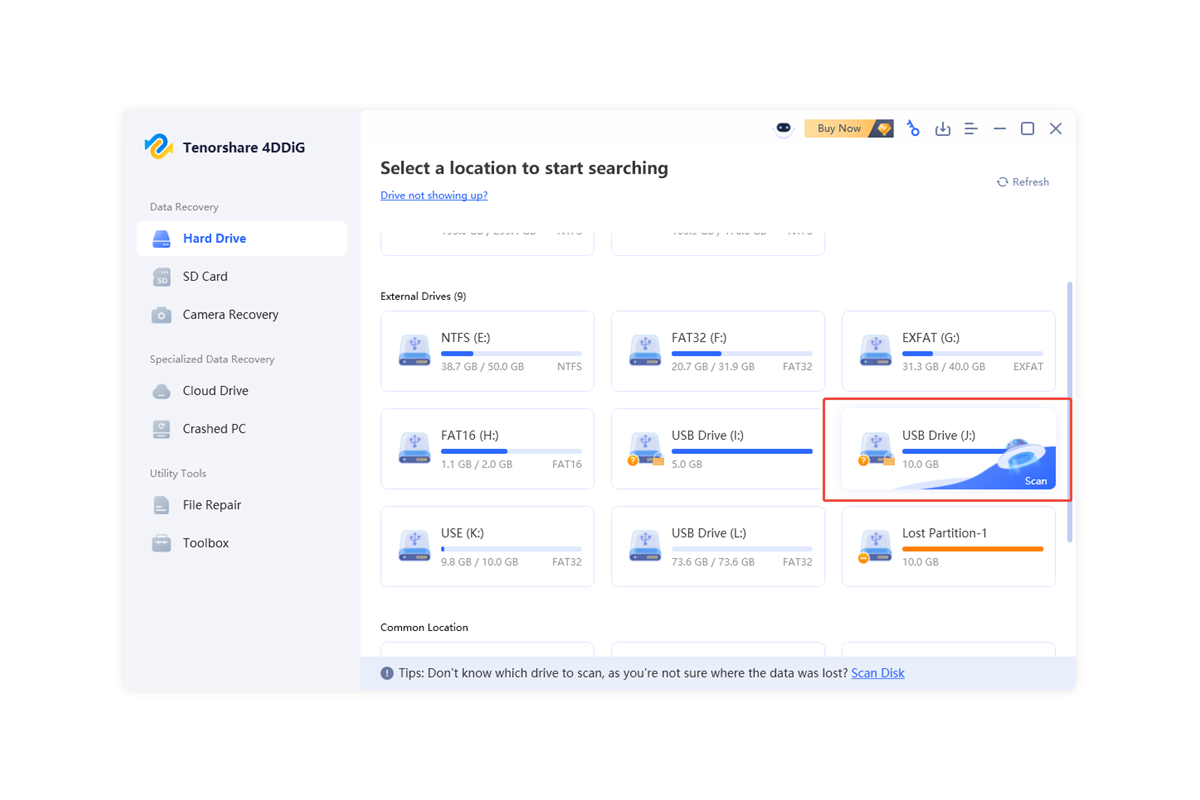
Step 2: Next, pick the file types to scan. Confirm scanning. Enter the BitLocker recovery key.
Step 3: If you don’t know the key, employ “One-click auto unlock.” This will locate any available recovery keys and access the drive.

Step 3: Once the BitLocker-protected drive is unlocked, the recovery tool will examine it for missing data.

Step 4: Inspect the recovered files. Hit “Recover” to move them to your computer or cloud storage.

Part 3: 5 Ways to Bypass BitLocker Recovery Blue Screen
Here’s how to bypass BitLocker recovery blue screen for different scenarios. Select a solution based on your situation:
Option A: Enter the BitLocker Recovery Key
When you have made too many wrong password attempts, you’ll get the blue recovery screen. But you can bypass BitLocker recovery screen by employing the correct recovery key. If you don’t remember the key, your system administrator can get it for you from the Active Directory using the key ID shown on the recovery screen. However, this method will only function if you have a work or school Azure account. Here’s how to bypass BitLocker recovery blue screen with the recovery key:
Step 1: Press “Esc” on the BitLocker recovery screen. This will display the recovery key ID.
Step 2: Jot the ID down or snap its photo. Then, give the ID to your system administrator.
If you are using a Mac to document troubleshooting steps or save information displayed on another device, this guide explains how to take a screenshot on Mac.

Step 3: Admin will look up the matching key in Active Directory. They’ll input the recovered key to bypass BitLocker recovery screen.
Option B: Bypass BitLocker Using Command Prompt
If you want to remove BitLocker without key, employ the Command Prompt. This method erases the protection from the encrypted disk using the advanced options on the blue BitLocker recovery screen. Follow the instructions beneath to bypass BitLocker with Command Prompt:
Step 1: On the BitLocker recovery screen, press “Esc.” To remove BitLocker without key, click “Skip this drive.”
Step 2: Head to “Troubleshoot.” Then, choose “Advanced options.” Tap “Command Prompt.”
Step 3: Type the following command. Hit “Enter” afterward. This will unlock the disk.
- manage-bde -unlock [place your locked drive letter here]: -rp
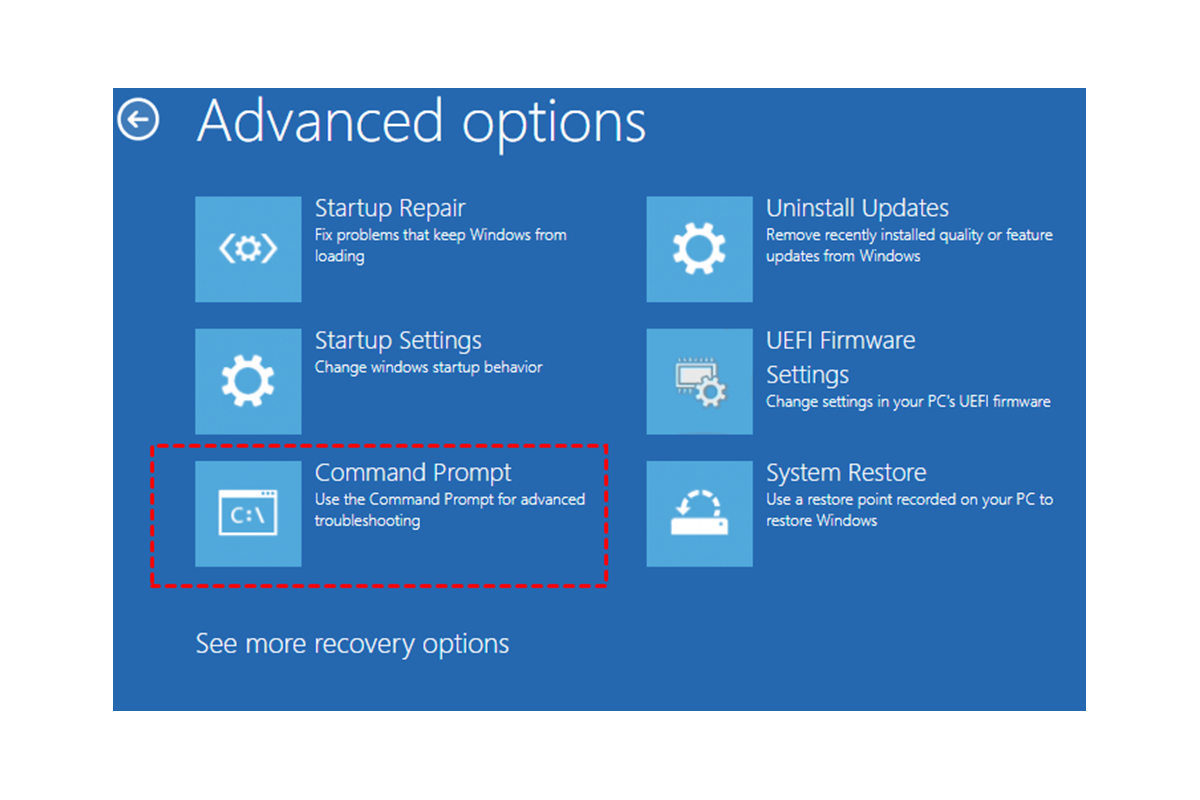
Step 4: Next, type the following command. Hit “Enter” afterward to bypass BitLocker with Command Prompt:
- manage-bde -protectors -disable [place your locked drive letter here]
Step 5: You’ll be able to bypass BitLocker with Command Prompt. Next, exit “Command Prompt.” Restart your PC.
When documenting Command Prompt procedures, a screen recording can help capture the sequence of actions for later reference. This guide covers how to use a screen recorder.
A dedicated screen recorder can also be useful for creating troubleshooting demonstrations and software walkthroughs.
For more advanced tutorial creation, you can explore Movavi Screen Recorder for professional tutorials.
Another option for capturing desktop activity is iFun Screen Recorder.
You can also read about the iTop Screen Recorder Pro license key giveaway if you are exploring different screen recording tools.
Option C: Update BIOS
An older BIOS version can trigger BitLocker to falsely view a security threat, activate recovery mode, or fail to properly sync with TPM. One approach to bypass BitLocker on Windows 11/10 is to upgrade your BIOS to the newest release. This is because the updated version will properly communicate with the TPM (Trusted Platform Module) and boot environment. Here’s how to bypass BitLocker recovery blue screen by updating the BIOS:
Step 1: Look for “Advanced options.” Execute “Command Prompt.”
Step 2: Type the following command. This will check your current BIOS version. Hit “Enter” afterward:
- wmic bios get smbiosbiosversion

Step 3: Press the “Win + R” keys. This will open “Run.” Type “msinfo32.” Then, check your BIOS version and release date.
Step 4: Move to your computer manufacturer’s support page. From there, get the latest BIOS update.
Step 5: Extract the downloaded BIOS update ZIP file. Next, save the update to a folder.
Step 6: After this, format a USB drive to “FAT32.” Then, copy the BIOS update files to it.
Step 7: Restart your PC. Then, hit the BIOS key during boot (F1, F12, Del, or Esc).
Step 8: In the BIOS “Boot” menu, make sure the USB drive is detected. Enable any backup options.
Step 9: Head to “Advanced.” Then, choose “USB Configuration.” Start the BIOS update procedure.
Step 10: After the update, your computer will restart, and you’ll be able to remove BitLocker without key.
When troubleshooting a computer, it can also be useful to understand how its processor is performing. This guide explains how to monitor and control CPU temperature effectively.
A CPU temperature monitor can help you keep track of processor heat while diagnosing performance issues.
Option D: Switch to Legacy Boot Mode
Changing the boot mode to UEFI could produce a BitLocker recovery screen. Thus, to bypass BitLocker on Windows 11/10, reset the boot mode to Legacy. This will let your system boot and so avoid the recovery prompt. Follow these instructions:
Step 1: Reboot your computer. Next, hit the BIOS key during boot (F1, F12, Del, or Esc).
Step 2: Click on the “Boot” tab. Then, pick “UEFI/BIOS Boot Mode.”
Step 3: Choose “Legacy” mode. After this, hit “F10” to save changes. Exit BIOS.
Option E: Disable the Secure Boot
Turning off Secure Boot can sometimes help you get past the BitLocker recovery screen. Here’s how to deactivate it:
Step 1: Look for the “Advanced options” screen. Then, choose “UEFI Firmware Settings.”
Step 2: Tap “Restart.” Your computer will restart in the UEFI. Next, head to “Security” settings.
Step 3: Adjust the “Secure Boot” to “Disabled.” Hit “F10” to save the changes
Step 4: Close BIOS. Then restart your computer.
Final Words
BitLocker recovery blue screen may materialize due to incorrect passwords, alteration of hardware or BIOS, or problems with TPM, Secure Boot, or boot settings. But you can bypass BitLocker screen successfully. Simply, enter the recovery key, employ Command Prompt, edit BIOS, change to Legacy mode, or disable Secure Boot. To avoid data loss, use 4DDiG Data Recovery. It can unlock BitLocker drives, restore lost files, and fix corrupted data with high success.
When setting up a computer after resolving a recovery issue, display choice may also matter for everyday use. If you use your PC for gaming, this guide to gaming monitors covers display features worth considering.
Spending long hours in front of a screen can also cause eye strain and discomfort. Read our guide to dealing with screen fatigue for practical ways to reduce these effects.
For users who want to reduce reflections while working or troubleshooting, this explanation of what an anti-glare screen is may be useful.
You can compare monitor designs and specifications in this ASUS VE228H 21.5-inch HDMI LED monitor review.
If you need a larger or more flexible display for a workstation, you can also explore this DLab portable monitor overview.
For another perspective on monitor features and everyday display use, read how LG monitors elevate everyday life.
How to Bypass BitLocker Recovery Blue Screen FAQ
Q1: What is the default BitLocker password?
BitLocker does not have a set password. You will have to create a unique 48-digit recovery key after you turn on the encryption. This key cannot be produced with the aid of any other tool.
Q2: How many attempts to unlock BitLocker?
Depending on your TPM and configurations, the number of false PIN attempts before BitLocker shuts down your computer varies. With TPM 2.0, the system locks after 32 failed attempts, then gradually allows further attempts over time.
The counter resets after a long enough break, roughly 64 hours. In workplaces, administrators can change these limits through Group Policy, often setting custom lockout times. But older systems may only allow around four wrong attempts by default.
If you need to capture the recovery screen or document an error in Google Chrome while troubleshooting, this guide explains how to solve screenshot issues on Google Chrome.
Windows users can also explore ScreenshotX for taking beautiful screenshots on Windows when saving visual records of troubleshooting steps.