

This article is part of our Operating Systems and System Software resource section.
If you’ve opted for Magento for your e-commerce store, consider using extensions to customize it efficiently. Check out Mirasvit, a leading developer of Magento extensions, for more information on their products at Mirasvit.
Table of Contents
Guide to Installing Magento 2.4.7 on Ubuntu 20.04
Step 1: Updating all packages on Ubuntu
Ubuntu provides the foundation for this installation as an operating system that manages the underlying hardware and software environment.
Because Ubuntu is part of the Linux ecosystem, understanding the basics of the Linux operating system can be helpful before working through the installation steps.
1.1 Ensure Ubuntu is up to date by running:
# sudo apt update
# sudo apt upgrade
Step 2: Installing Apache
2.1 Install Apache web server with:
# sudo apt install apache2
2.2 Start and enable Apache:
# sudo systemctl start apache2
# sudo systemctl enable apache2
2.3 Check Apache’s status:
# sudo systemctl status apache2
Step 3: Installing PHP and Extensions
Install PHP 8.3 and required extensions:
# sudo apt install php php-exif php-bz2 php-bcmath php-intl php-soap php-zip php-curl php-mbstring php-mysql php-gd php-xml
3.2 Verify PHP installation:
# php -v
3.3 Edit PHP settings:
# sudo nano /etc/php/8.3/apache2/php.ini
Adjust the following values:
short_open_tag = On
memory_limit = 512M
upload_max_filesize = 128M
max_execution_time = 3600
Save and exit. Finally, restart Apache:
# sudo systemctl restart apache2
Step 4: Install MySQL and Set Up a Database
4.1 Install MySQL:
# apt install mysql-server
4.2 Check MySQL Service Status:
# systemctl status mysql
4.3 Secure MySQL Installation:
- Run the security script to set up the necessary security features:
# mysql_secure_installation
- Set a root password.
- Remove anonymous users.
- Disallow remote root login.
- Remove the test database and access to it.
- Reload privilege tables.
4.4 Log Into MySQL Shell:
# mysql -u root -p
4.5 Inside the MySQL Shell, Execute the Following Commands to create a new database and user, then grant privileges:
CREATE DATABASE magentodb;
CREATE USER ‘magentouser’@’localhost’ IDENTIFIED BY ‘Str0ngPa$$w0rd’;
GRANT ALL PRIVILEGES ON magentodb.* TO ‘magentouser’@’localhost’;
FLUSH PRIVILEGES;
EXIT;
Step 5: Installing Elasticsearch
Follow these steps to install Elasticsearch:
5.1 Import the GPG key and add the repository:
# wget -qO – https://artifacts.elastic.co/GPG-KEY-elasticsearch | sudo gpg –dearmor -o /usr/share/keyrings/elasticsearch-keyring.gpg
# echo “deb [signed-by=/usr/share/keyrings/elasticsearch-keyring.gpg] https://artifacts.elastic.co/packages/8.x/apt stable main” | sudo tee /etc/apt/sources.list.d/elastic-8.x.list
5.2 Update the package manager and install Elasticsearch:
# apt update && apt install elasticsearch
5.3 Start and enable the Elasticsearch service:
# systemctl start elasticsearch
# systemctl enable elasticsearch
5.4 Update the Elasticsearch configuration:
# nano /etc/elasticsearch/elasticsearch.yml
5.5 Restart the Elasticsearch service:
# systemctl restart elasticsearch
5.6 Verify the Elasticsearch installation by running:
# curl -X GET “localhost:9200/”
Step 6: Installing Composer
As you work through the command-line installation, familiarity with basic utilities such as the cat command in Linux and Unix can also be useful when viewing or working with configuration files.
To install Composer, follow these steps:
6.1 Download Composer:
# curl -sS https://getcomposer.org/installer | php
6.2 Move the Composer file and make it executable:
# mv composer.phar /usr/local/bin/composer
# chmod +x /usr/local/bin/composer
6.3 Verify the Composer version:
# composer –-version
You should see output similar to:
Composer version 2.7.2 2024-03-11 17:12:18
Step 7: Install Magento 2.4.7
7.1 Create access keys on Magento Marketplace.
7.2 Download Magento 2.4.7:
# composer create-project –repository-url=https://repo.magento.com/ magento/project-community-edition=2.4.7 /var/www/magento2
7.3 Set permissions and ownership:
# find var generated vendor pub/static pub/media app/etc -type f -exec chmod g+w {} +
# chown -R www-data:www-data /var/www/magento2
# chmod -R 755 /var/www/magento2
7.4 Install Magento:
# bin/magento setup:install –base-url=http://your-domain.com –db-host=localhost –db-name=magentodb –db-user=magentouser –db-password=’Str0ngPa$$w0rd’ –admin-firstname=Admin –admin-lastname=User –admin-email=admin@your-domain.com –admin-user=admin –admin-password=admin123 –language=en_US –currency=USD –timezone=America/Chicago –use-rewrites=1
Step 8: Configure Apache for Magento 2.4.7
8.1 Create a new VirtualHost file:
# nano /etc/apache2/sites-available/magento2.conf
8.2 Paste the following, replacing “my-unique-store.com” with your domain:
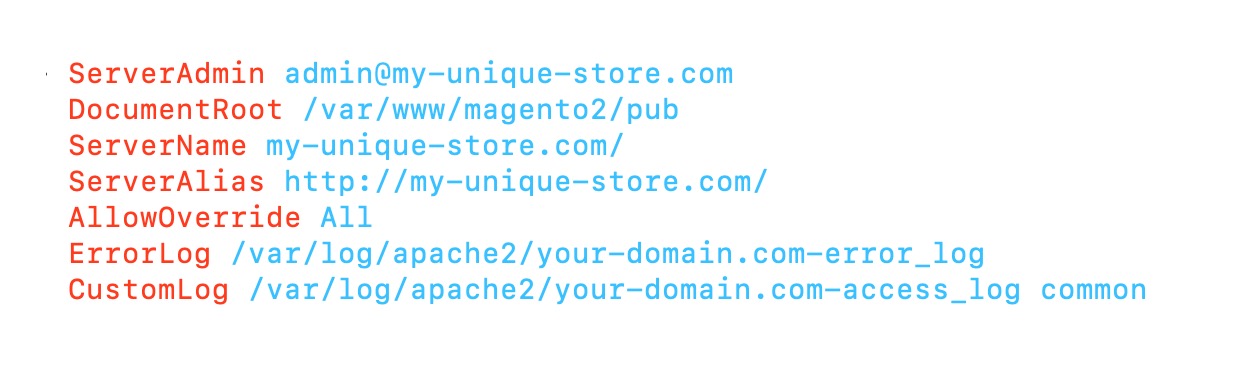

8.3 Enable rewrite module and site:
# a2enmod rewrite
# a2ensite magento2.conf
8.4 Restart Apache:
# systemctl restart apache2
Step 9: Access Your Magento 2.4.7 Application
You can access your Magento 2.4.7 application: open your web browser and enter your domain: http://my-unique-store.com/ and complete the configuration.
Troubleshooting Common Installation Issues
PHP Compatibility. Confirm PHP version and necessary extensions are installed.
Permission Errors. Ensure correct permissions for Magento directories and files.
Database Connection Problems. Verify MySQL is operational and credentials are accurate.
Missing PHP Extensions. Install any required extensions not present for Magento.
Apache Configuration. Enable mod_rewrite and set AllowOverride All as needed. These configuration and troubleshooting tasks are also common responsibilities for a Linux system administrator managing web servers and applications.
Composer Dependency Challenges. Adjust PHP memory limits and review composer.json for compatibility.
Installation Script Failures. Execute the installation script via command line and examine server logs for errors.
For further assistance, Magento’s official forums or documentation offer comprehensive troubleshooting resources.
Magento installation use cases on Ubuntu
E-commerce startups
New businesses looking for a flexible and scalable platform to launch their online business can use Magento to create a customized store with a wide range of functionality.
Migration from other platforms
Companies with an online store on another platform but want to switch to Magento because of its flexibility and extensibility can use Ubuntu as a stable and reliable foundation for Magento.
Development and testing
If you want to understand how the platform behind Ubuntu developed over time, reading the story of Linux provides useful background on its open-source origins and evolution.
Developers can set up a local or test environment on Ubuntu to develop new Magento modules or integrate with other systems.
Scaling for large enterprises
Large companies that need to scale their e-commerce capabilities can use Magento on Ubuntu to optimize performance and ensure the high availability of their resources.
Integration with corporate systems
Magento can be integrated with various enterprise systems, such as ERP or CRM, and Ubuntu provides a stable platform for such integrations.
Geographical expansion
Companies planning geographic expansion and needing additional servers can use Ubuntu as a uniform OS for servers in different locations.
Key Takeaways
Extensions Use. Enhance Magento’s functionality with extensions from providers like Mirasvit.
Installation Process. Follow a detailed installation process, including setting up necessary software like Apache, PHP, MySQL, and Elasticsearch.
Configuration. Ensure server settings, such as PHP configurations and database permissions, are optimized for Magento.
Additional Considerations
Security. Implement robust security measures including strong passwords, HTTPS, and regular updates.
Troubleshooting. Be prepared to address common issues like PHP compatibility, permission errors, and database connection problems.
Maintenance. Regular maintenance is essential for performance and security.
Overall, a successful Magento setup on Ubuntu requires detailed attention to installation, security settings, and ongoing system management.