![Wondershare Filmora: Video Editing Features You Want [2025]](https://www.computertechreviews.com/wp-content/uploads/2022/05/The-Video-Editing-Features-You-Want-in-Wondershare-Filmora-1200x675.jpg)
Table of Contents
Introduction
Wondershare Filmora – Your video editing skills are the second most significant factor to consider when selecting video editing software, behind the technical requirements. Inexperienced video editors typically do not need advanced video editing functions, so there’s little point in spending hundreds of dollars on software that includes functionality you’ll never use. In the table below, you’ll find some of the top entry-level and professional video editing software applications for Mac and PC systems.
All newbies to the field of video editing, as well as semi-professionals in need of a powerful and easy-to-use video editor, should consider purchasing Wondershare Filmora, which can be used on both Mac and PC machines.
The software allows you to simply accomplish all fundamental video editing tasks, as well as complex video editing tools like Chroma Key Effect, image stabilization, and time-lapse. In addition, Filmora has a robust effects library that is regularly updated and already includes over 300 beauty and fashion filters that can be applied to videos in a matter of seconds. Tips: In our best software picks, you may read the introduction and review each item listed above.
How to Use Filmora to Edit Videos
You never know what you’ll need in the video editing room, which is why you must be properly prepared for all of the obstacles that will arise during the video editing process. Because post-production can take days, if not months, prepare yourself with patience and remember that you are not in a competition; take it slowly.
Check out the video below to learn how to make your first video with Filmora, and then download the free trial version of Filmora to follow along. Before you begin editing, take a few notes.
Preparation for the video editing process begins long before the program is launched, so here are a few pointers to help you streamline the post-production process.
While you’re on location, take multiple shots of the same scene so you have more alternatives in the editing room. Knowing every second of the material you’re working with will help you pick the greatest shots quickly, use visual effects sparingly and only when necessary, learn how to take a step back and look at the project from a different angle, And keep your materials in order.
Video Editing
A Step-by-Step Guide
All video editing suites use the same basic video editing techniques. We’ll show you how to edit videos in Wondershare Filmora in this guide, but the techniques you’ll learn here can be applied to other video editing software tools as well. If you don’t already have Wondershare Filmora installed on your computer, you can get a free trial version by clicking the icon below.
When you’re ready to start working on a new video, double-click Filmora’s desktop icon. The software’s welcome screen will appear, prompting you to start a new project or open an existing one. You can also select the aspect ratio here to save time when editing.
Make a new project and add the footage to it.
Wait for the editor to load after clicking New Project on the software’s welcome screen. After you’ve gained access to Fillmora’s video editor for YouTube, you should click the Register button to register the product.
Select the aspect ratio for the final edit of your video by going to the File menu and selecting Project Settings. You’ll be able to select from a variety of aspect ratios, including the typical 16:9 or 4:3 ratios, as well as the less popular 9:16 aspect ratio for vertically oriented films and the 1:1 aspect ratio for square-shaped videos. You can also change the aspect ratio to suit your requirements.
Filmora, like all of the other video editing software we’ve discussed in this book, can handle almost any form of the video file, from videos shot with smartphones and webcams to footage shot with professional equipment.
The Import button can be found in the upper left corner of the video editor click it and choose Import Media Files, then navigate to the folder on your hard drive where the material you wish to edit is located. Click the Import button after selecting the video, audio, or photo files you wish to utilize in your project.
Import with Instant Cutter Tool is now available in the Import menu. The Instant Cutter Tool was created with you in mind.
Assemble the materials you’ll need for your project.
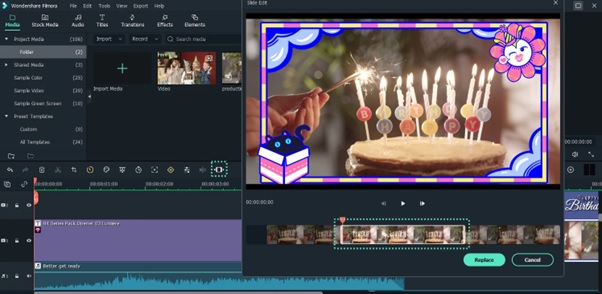
Filmora’s Media tab, underneath the Load button, will hold the files you import into the editor. When you have to search for the video clips you want to add to the timeline, working with several different files in a single project becomes considerably more difficult. You can utilize the My Album option to create folders and organize your files to reduce clutter and confusion.
To create and name a new folder, click the Add a New Folder icon at the bottom of the My Project tab in the upper right corner of the editor’s screen. You can arrange the footage in any way you choose, even alphabetically. Remove the superfluous parts of the video and audio files from the timeline.
Because raw footage frequently contains errors orbits that don’t belong in your video, if you want to chop or trim your videos, simply drag them from the Media tab and drop them on the timeline. You can add as many video clips as you want, but each new one will be added after the previous one, and you must drag the files to the proper position on the timeline to rearrange them.
To begin previewing the video clips you’ve added to the timeline, press Play or use the Spacebar, or use the play head to jump to a specific place in the film.
You may trim your videos in Filmora by simply dragging the end of a video clip left or right. If you’re still having trouble with trimming and cutting videos, here’s a video tutorial that will help you quickly learn these basic tools.
Pricing And Plan
The price of the tool varies from different packages. Some have higher prices some have low. You can choose plans as per your best suitability. You can buy the whole package for just 79.99 dollars for your whole life.
Filmora can be purchased from the following locations:
The software can be downloaded very easily. It is easy to find the software from
Download Now:
Filmora for Windows: https://filmora.wondershare.com/video-editor/
Filmora for Mac:https://filmora.wondershare.com/video-editor-mac/
Filmora for iPad:https://apps.apple.com/us/app/filmora-video-editor-on-ipad/id1459336970
To get the proper instructions for using it, you just need to download and install the software. You just need to quickly download the software and follow their instructions. You will soon be able to start enjoying the new era in editing.
Conclusion
It is now so common to have a YouTube channel. Even if someone does not have a YouTube channel they are still interested in keeping their memories, whether it is a trip, marriage, or just one day. They want to preserve it. We all want to save all of those memories in video format.
Filmora makes each video even more special by making your memories shine. Filmora is a team you can trust and will not disappoint. While it is simple to create a video, professional videographers know how to make it look impressive and appealing. Filmora 4K resolution will make it easy for you.